Python性能监控Graphite
发布时间:2019-09-22 07:49:16编辑:auto阅读(2241)
graphite-web:web接口
carbon:相当于network interface
whisper:相当于rrdtool
目前主流的开源监控有Cacti、Nagios、Zabbix等等,社区活跃,功能强大
Graphite虽然在功能上和社区在无法与此对比,但是在灵活度上还是值得一提的,轻量级的监控程序,更为重要的是Graphite是Python编写的,所以在问题排查,脚本编写等都会非常顺手
同样也非常感谢更多Python开源者的贡献!!!
一、简介
Graphite 是一个Python写的web应用,采用django框架,Graphite用来进行收集服务器所有的及时状态,用户请求信息,Memcached命中率,RabbitMQ消息服务器的状态,Unix操作系统的负载状态,Graphite服务器大约每分钟需要有4800次更新操作,Graphite采用简单的文本协议和绘图功能可以方便地使用在任何操作系统上。
graphite有三个组件:
graphite官方文档:
http://graphite.wikidot.com/documentation
http://graphite.readthedocs.org/en/latest/
二、安装graphite
1、安装epel源
rpm -ivh http://dl.fedoraproject.org/pub/epel/6/x86_64/epel-release-6-8.noarch.rpm
sed -i 's@^#@@' /etc/yum.repos.d/epel.repo
sed -i 's@mirrorlist@#mirrorlist@' /etc/yum.repos.d/epel.repo
2、安装适应版本的Django软件包,版本过高会出现bug
yum install python-simplejson
wget https://kojipkgs.fedoraproject.org//packages/Django14/1.4.14/1.el6/noarch/Django14-1.4.14-1.el6.noarch.rpm
rpm -ivh Django14-1.4.14-1.el6.noarch.rpm
3、安装graphite
yum install graphite-web python-carbon python-whisper
4、安装MySQL数据库
yum install mysql mysql-server MySQL-python
service mysqld start
chkconfig mysqld on
mysqladmin -uroot password 123456
mysql -uroot -p123456 -e 'create database graphite;'
5、修改graphite配置文件
# cat >> /etc/graphite-web/local_settings.py << EOF
SECRET_KEY = '123qwe'
ALLOWED_HOSTS = [ '*' ]
TIME_ZONE = 'Asia/Shanghai'
DEBUG = True
DATABASES = {
    'default': {
        'NAME': 'graphite',
        'ENGINE': 'django.db.backends.mysql',
        'USER': 'root',
        'PASSWORD': '123456',
        'HOST': '127.0.0.1',
        'PORT': '3306'
    }
}
from graphite.app_settings import *
EOF
6、同步数据库
mkdir -p /opt/graphite/storage
cd /etc/graphite-web/
django-admin syncdb --settings=local_settings --pythonpath=.
yes
root
zhengys@allentuns.com
123456
123456
7、修改graphite数据目录
chown -R apache.apache /opt/graphite/storage
8、启动服务
/etc/init.d/carbon-cache start
chkconfig carbon-cache on
/etc/init.d/httpd start
chkconfig httpd on
三、访问展示graphite
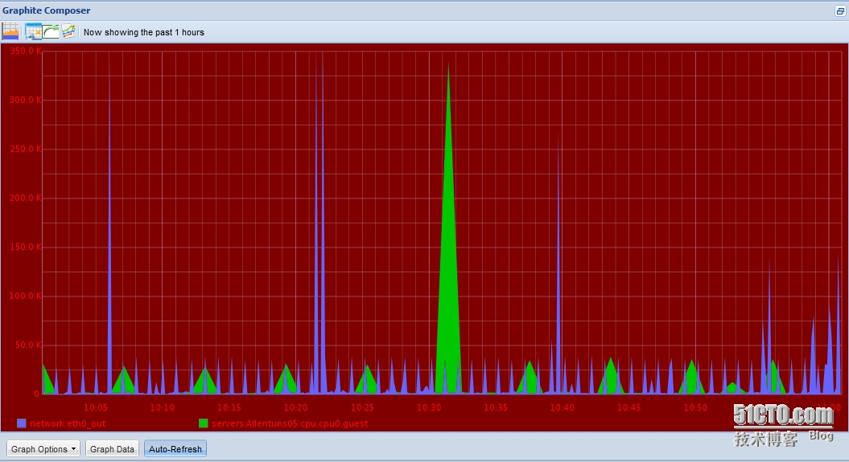
1、Chrome浏览器访问Ghipte的地址:
2、提供监控网卡流量的脚本
[root@Allentuns ~]# cat network_traffic.py
#!/usr/bin/env python

from subprocess import Popen,PIPE
import socket
import shlex
import time
import sys
import os

def get_traffic(f):
    p = Popen(shlex.split(f),stdout=PIPE,stderr=PIPE)
    result = p.stdout.read()
    d = [i for i in  result.split('\n')[3:] if i]
    dic_traffic = {}
    for i in d:
        devname = i.split(':')[0].strip()
        Receive = i.split(':')[1].split()[0].strip()
        Transmit = i.split(':')[1].split()[8].strip()
        dic_traffic[devname] = {'in':Receive,'out':Transmit}
    return dic_traffic

if __name__ == '__main__':
    try:
    	HOST = '127.0.0.1'
	PORT = 2003
    	s = socket.socket()
    	s.connect((HOST,PORT))
    except:
	print "Couldn't connect to %(server)s on port %(port)d, is carbon-agent.py running?" % {'server':HOST,'port':PORT}
	sys.exit(1)

    while True:
    	cur_traffic = get_traffic('cat /proc/net/dev')
    	time.sleep(5)
    	five_s_traffic = get_traffic('cat /proc/net/dev')
    	diff_dic = {}
        for k in cur_traffic:
	    traffic_in = int(five_s_traffic[k]['in']) - int(cur_traffic[k]['in'])
	    traffic_out = int(five_s_traffic[k]['out']) - int(cur_traffic[k]['out'])
	    diff_dic[k] = {'in':traffic_in,'out':traffic_out}
	now = int(time.time())
	for k,v in diff_dic.items():
	    net_in = 'network.%s_in %s %s\n' % (k,v['in'],now)
	    net_out = 'network.%s_out %s %s\n' % (k,v['out'],now)
	    s.sendall(net_in)
	    s.sendall(net_out)
	time.sleep(5)
3、后台方式运行监控网卡流量脚本
[root@Allentuns ~]# python network_traffic.py &
四、安装Diamond
diamond :搜集器、用于搜集数据
diamond的github官方站点:https://github.com/python-diamond/Diamond/wiki
1、安装Diamond
yum install gcc gcc-c++ python-configobj python-pip python-devel
pip install diamond==3.4.421	(有时候会安装不成功)
如果下载安装不成功可以使用以下方式进行
wget https://pypi.python.org/packages/source/d/diamond/diamond-3.4.421.tar.gz#md5=080ab9f52a154d81f16a4fd27d11093a
tar xf diamond-3.4.421.tar.gz
cd diamond-3.4.421
python setup.py install
2、配置
cd /etc/diamond/
cp diamond.conf.example diamond.conf
主要修改三个配置文件:
[root@Allentuns diamond]# vim /etc/diamond/diamond.conf
`GraphiteHandler` 	//59行
host = localhost
`default`			//173行
interval = 10		//时间搜集一次

[root@Allentuns diamond]# vim /etc/diamond/handlers/ArchiveHandler.conf
#log_file = ./storage/archive.log	//注释此行
[root@Allentuns diamond]# vim /etc/diamond/handlers/GraphiteHandler.conf
host = localhost
3、启动diamond服务
chmod +x /etc/init.d/diamond
/etc/init.d/diamond start
chkconfig diamond on
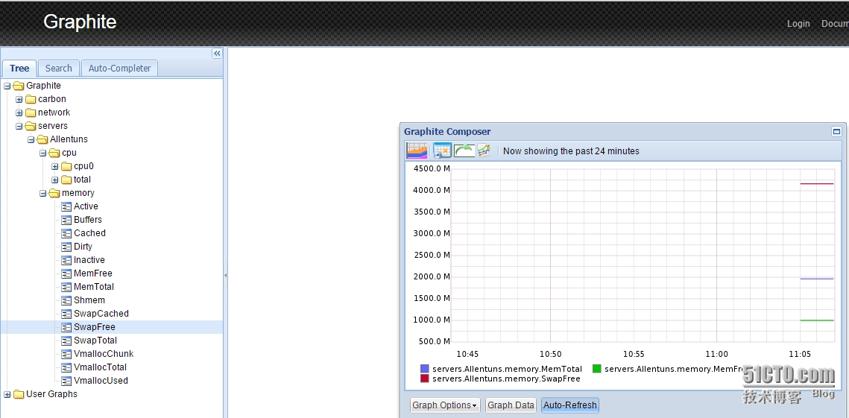
五、继续访问展示diamond自动采集信息
1、Chrome浏览器访问Ghipte的地址:
你会发现在Graphite下多了一个servers的目录,这个目录就是diamond自动采集的信息
2、在这里提供了两个python脚本,用来搜集web站点的httpcode,是基于diamond的方式
[root@Allentuns ~]# cd /usr/share/diamond/collectors
[root@Allentuns collectors]# mkdir httpcode && cd $_
[root@Allentuns httpcode]# ll
总用量 8
-rwxr-xr-x 1 root root 1356 3月  31 11:12 filerev.py
-rwxr-xr-x 1 root root 3737 3月  31 11:12 httpcode.py
3、运行搜集httpcode的脚本
首先删除原来diamond生成的servers目录
[root@Allentuns httpcode]# rm -rf /var/lib/carbon/whisper/servers/
然后手动运行diamond的httpcode脚本
[root@Allentuns httpcode]# diamond -f -l -r ./httpcode.py  -c /etc/diamond/diamond.conf
ERROR: Pidfile exists. Server already running?		#需要手动停止diamond服务
[root@Allentuns httpcode]# /etc/init.d/diamond stop
Stopping diamond:                                          [确定]
[root@Allentuns httpcode]# diamond -f -l -r ./httpcode.py  -c /etc/diamond/diamond.conf
[2015-03-31 11:13:56,198] [MainThread] Changed UID: 0 () GID: 0 ().
[2015-03-31 11:13:56,198] [MainThread] Loaded Handler: diamond.handler.graphite.GraphiteHandler
[2015-03-31 11:13:56,201] [MainThread] GraphiteHandler: Established connection to graphite server localhost:2003.
[2015-03-31 11:13:56,202] [MainThread] Loaded Handler: diamond.handler.archive.ArchiveHandler
[2015-03-31 11:13:56,206] [MainThread] Loading Collectors from: .
[2015-03-31 11:13:56,209] [MainThread] Loaded Module: httpcode
[2015-03-31 11:13:56,209] [MainThread] Loaded Collector: httpcode.HttpCodeCollector
[2015-03-31 11:13:56,209] [MainThread] Initialized Collector: HttpCodeCollector
[2015-03-31 11:13:56,210] [MainThread] Skipped loading disabled Collector: HttpCodeCollector
[2015-03-31 11:13:56,210] [MainThread] Started task scheduler.
[2015-03-31 11:13:57,211] [MainThread] Stopping task scheduler.
[2015-03-31 11:14:01,217] [MainThread] Stopped task scheduler.
[2015-03-31 11:14:01,217] [MainThread] Exiting.
如果没有报错,则查看浏览器会发现多了一个servers目录;但是当时目录就是没有生成,我还真纳闷了。原来在配置文件中没有启动此配置
[root@Allentuns httpcode]# vim httpcode.py
......
config = super(HttpCodeCollector, self).get_default_config()
        config.update({
            'path':     'weblog',
            'enabled':  'True'	#开启此选项
        })


如果用diamond来搜集,则无需此选项,因为diamond有针对类的配置文件,在配置文件中开启会比在脚本中开启看起来更统一
4、在脚本中关闭,在diamond中的配置文件中自动启用此选项
# cd /etc/diamond/collectors/
# cp CPUCollector.conf HttpCodeCollector.conf
# cat HttpCodeCollector.conf
byte_unit = byte,
enabled = true
5、浏览器查看
Chrome刷新Ghipte的web页面,查看
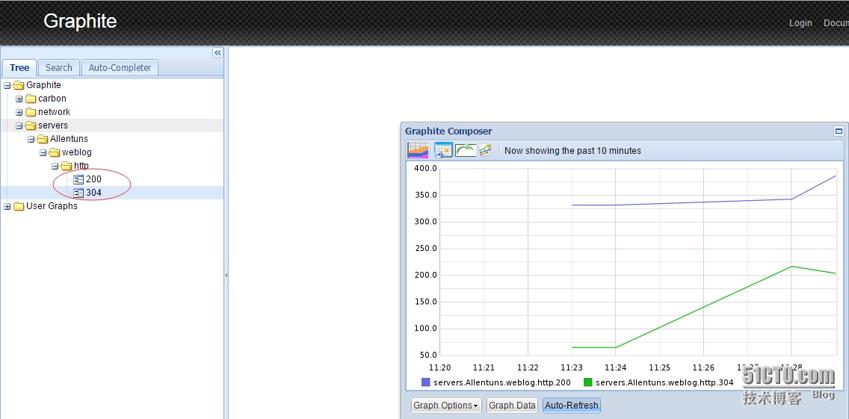
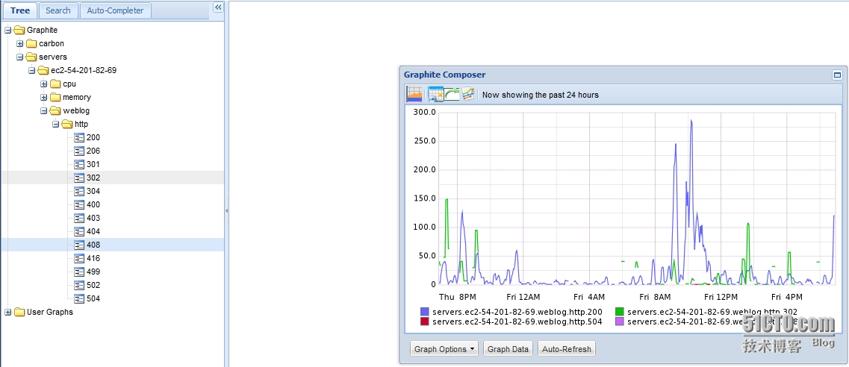
Ghipte -> servers -> ec2-54-201-82-69 -> weblog(自定义) -> http 会出现以下监控曲线图
我们可以使用ab -c 100 -n 100 http://localhost/ 产生200状态码
使用刷新Ghipte的浏览器页面产生304的状态码
另外补充一个截图
上一篇: HoneyDrive_3基础学习
下一篇: Python之MySQL
- openvpn linux客户端使用
51967
- H3C基本命令大全
51768
- openvpn windows客户端使用
42052
- H3C IRF原理及 配置
38894
- Python exit()函数
33389
- openvpn mac客户端使用
30355
- python全系列官方中文文档
28994
- python 获取网卡实时流量
24012
- 1.常用turtle功能函数
23926
- python 获取Linux和Windows硬件信息
22286
- Ubuntu本地部署dots.ocr
480°
- Python搭建一个RAG系统(分片/检索/召回/重排序/生成)
2651°
- Browser-use:智能浏览器自动化(Web-Agent)
3347°
- 使用 LangChain 实现本地 Agent
2766°
- 使用 LangChain 构建本地 RAG 应用
2756°
- 使用LLaMA-Factory微调大模型的function calling能力
3535°
- 复现一个简单Agent系统
2718°
- LLaMA Factory-Lora微调实现声控语音多轮问答对话-1
3547°
- LLaMA Factory微调后的模型合并导出和部署-4
5848°
- LLaMA Factory微调模型的各种参数怎么设置-3
5633°
- 姓名:Run
- 职业:谜
- 邮箱:383697894@qq.com
- 定位:上海 · 松江


