Linux运维常用知识(3)
发布时间:2019-09-13 09:31:32编辑:auto阅读(3018)
Apache日志统计举例
参考:http://loveyan.blog.51cto.com/829079/745164
http://blog.sina.com.cn/s/blog_79bc8e830101m84w.html
http://www.ttlsa.com/linux/site-troubleshooting-common-commands/
http://www.haiyun.me/archives/nginx-log.html
(1)查看IP($1代表IP)
#cat access_log | awk '{print $1}'
(2)对IP排序
#cat access_log | awk '{print $1}'| sort
(3)打印每一重复行出现的次数,“uniq -c”表示标记出重复数量。
#cat access_log | awk '{print $1}'|sort| uniq -c
(4)排序并统计行数
#cat access_log | awk '{print $1}'|sort|uniq -c|sort -rn | wc -l
(5)显示访问前10位的IP地址,便于查找***源
#cat access_log|awk '{print $1}'|sort|uniq-c|sort -nr| head -10
注意awk '{print$1',它表示取日志的第一段,如果换成别的日志,其IP地址在第3段那么就要改变相应数值。
(6)显示指定时间以后的日志($4代表时间)
#cat access_log |awk'$4>="[23/Jul/2012:01:00:01"' access_log
(7)找出访问量最大的IP,并封掉(对排错很有帮助)
#cat access_log |awk '{print $1}'|sort|uniq -c|sort -nr | more
9999192.168.150.179
11 192.168.150.1
#iptables -I INPUT -s 192.168.150.179 -j DROP
#iptables -I INPUT -s 192.168.150.0/24 -j DROP
如果将上面的Shell做以下变形就可以得出访问量TOP 10
#cat access_log |awk '{print $1}'|sort|uniq -c|sort -nr | head -10
(8)找出Apache日志中,下载最多的几个exe文件(下载类网站常用,这里以.exe扩展名举例)
# cat access_log |awk '($7 ~/.exe/){print "$10 "" $1 ""$4""$7}' |sort -n |uniq -c |sort -nr |head -10
2 - 192.168.150.1[25/Jul/2012:05:46:05/test.exe
1 -192.168.150.152[25/Jul/2012:05:46:47/test.exe
使用如下命令:
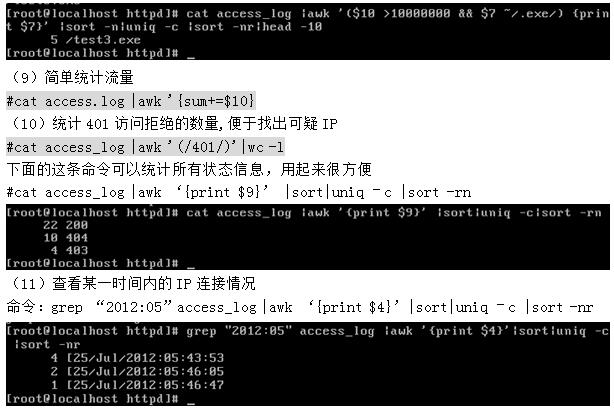
#cat access_log |awk `($10 >10000000&& $7 ~/.exe/) {print $7}` |sort –n|uniq –c|sort –nr|head -10
这条命令经过增加一个>10000000的条件判断内容就可以显示出大于10MB的exe文件,并统计对应文件发生次数,这条命令对于网站日常分析是非常有帮助的,大家可以灵活使用。
(12)把IP数量输出到文本显示:cat access_log_2011_06_26.log |awk '{print $1}'|uniq -c|wc -l > ip.txt
(13)查看 access.Log 文件ip统计(从高到低)
cat access.log |awk '{print $3}'|sort|uniq -c|sort -rn| wc -l
(14)查看Apache的并发请求数及其TCP连接状态
netstat -n | awk '/^tcp/ {++S[$NF]} END {for(a in S) print a, S[a]}'
返回结果示例:
  LAST_ACK 5
  SYN_RECV 30
  ESTABLISHED 1597
  FIN_WAIT1 51
  FIN_WAIT2 504
  TIME_WAIT 1057
其中的SYN_RECV表示正在等待处理的请求数;ESTABLISHED表示正常数据传输状态;TIME_WAIT表示处理完毕,等待超时结束的请求数。
linux下创建镜像文件
如果没有mkisofs命令,需要安装yum install -y mkisofs
[root@localhost ~]# mkdir test
[root@localhost ~]# mkisofs -o test.iso test  //创建镜像文件
I: -input-charset not specified, using utf-8 (detected in locale settings)
Total translation table size: 0
Total rockridge attributes bytes: 0
Total directory bytes: 0
Path table size(bytes): 10
Max brk space used 0
174 extents written (0 MB)
[root@localhost ~]# ls
anaconda-ks.cfg  install.log  install.log.syslog  test  test.iso
[root@localhost ~]# mkdir /jingxiang
[root@localhost ~]# mount -o loop test.iso /jingxiang  //挂载镜像文件
linux 使用shell脚本导出网络配置信息
#!/bin/bash
#此脚本是获取计算机当前的网络配置信息
#注意下面的'eth0'需要根据个人的网络适配器名称来进行修改
#1、获取ip地址

echo  "获取当前的ip地址是:"

#第一种方法

ifconfig eth0 |grep "inet addr:" |sed 's/.*addr://g'|sed 's/Bcast.*$//g'

#第二种方法

#ifconfig eth0 |grep "inet addr:" |sed 's/.*addr://g' |awk '{print $1}'

#2、获取子网掩码

echo "获取当前的子网掩码:"

ifconfig eth0 |grep "inet addr" |awk 'BEGIN{FS=":"}{print $4}'

#3、获取网关

echo "获取当前的网关:"

route -n |grep "UG" |awk '{print $2}'

#4、获取DNS

echo "获取当计算机的DNS地址:"

cat /etc/resolv.conf |grep "nameserver"|awk '{print $2}'

#5、获取MAC地址

echo "获取当前适配器的MAC地址:"

ifconfig |grep "^eth0" |awk '{print $5}'
Linux下网站备份脚本
#!/bin/bash
#backup database

mypw=CactiEZ
newtime=$(date +%Y%m%d)
if [ -d /var/www/backup/ ];then
mysqldump -u root -p$mypw DB > /var/www/backup/$newtime-Database.sql
else
mkdir /var/www/backup/
mysqldump -u root -p$mypw DB > /var/www/backup/$newtime-Database.sql
fi

tar -zcvf /var/www/backup/$newtime-www.tar.gz /var/www/

find /var/www/backup/ -mtime +4 -exec rm -rf {} \;
Linux下利用nc命令来监控检测服务器的端口使用情况
最近看到一个问题,前端用apache htttpd进行发布(80端口),通过双机负载均衡转发到后端的两个tomcat进行处理(8081和8082端口),现在需要随时监控这三个端口的情况,一旦down掉需要能够立即告警处理。批量的系统监控比较好的是用nagios软件来实现,小项目专门装一个nagios软件,有点繁琐,可以用nc(NetCat)命令来实现。
NetCat 官方地址:http://netcat.sourceforge.net/
参考:http://my.oschina.net/jccpp/blog/123430
http://www.cnblogs.com/wenbiao/p/3375811.html
[root@server ~]# yum install -y nc
[root@server ~]# rpm -qa nc
nc-1.84-22.el6.x86_64
一、nc命令检测端口的用法
-s<来源地址> 设置本地主机送出数据包的IP地址。
-u 使用UDP传输协议。
-v 显示指令执行过程。
-w<超时秒数> 设置等待连线的时间。
-z 使用0输入/输出模式,只在扫描通信端口时使用。
例1:扫描指定的8080端口
# nc -v -w 10 -z 192.168.0.100 8080
Connection to 192.168.0.100 8080 port [tcp/http] succeeded!
例2:扫描20到25的端口范围,并详细输出。
# nc -v -w 2 -z 192.168.0.100 20-25
例3:扫描1到65535的端口范围,只输出打开的端口(去掉-v参数即可)
# nc -w 1 -z 192.168.0.100 1-65535
二、批量检测服务器指定端口开放情况:
1、假如我们要监控一堆指定的IP和端口,可新建一个文件(第1列服务器IP,第2列要监控的端口)。
# vim /scripts/ip-ports.txt
192.168.0.100 80
192.168.0.100 8081
192.168.0.101 8082
192.168.1.100 21
2、我们可以写这样一个脚本来批量检测端口是否开放:
# vim /scripts/ncports.sh
#!/bin/bash
#检测服务器端口是否开放,成功会返回0值显示ok,失败会返回1值显示fail

cat /scripts/ip-ports.txt | while read line
do
  nc -w 10 -z $line > /dev/null 2>&1
  if [ $? -eq 0 ]
  then
    echo $line:ok
  else
    echo $line:fail
    echo "服务器 $line 端口不通,请尽快处理!" | mutt -s "【机房监控】服务器$line端口不通" test@139.com
  fi
done
3、执行脚本查看运行结果如下:
# chmod a+x /scripts/ncports.sh
# /scripts/ncports.sh
192.168.0.100 80:ok
192.168.0.100 8081:ok
192.168.0.101 8082:ok
192.168.1.100 21:fail
三、端口不通时设置邮件告警:
1、 邮件告警:
(1) 先安装linux下面的邮件发送程序mutt
(2) 如果上面的接收邮箱设置为移动139邮箱,并开启接收邮件短信告知,即可实现“短信告警”的功能。
(3) 端口不通时发送邮件
# vim /scripts/ncports.sh
#!/bin/bash
#检测服务器端口是否开放,成功会返回0值,打不开会返回1值
cat /scripts/ip-ports.txt | while read line
do
  nc -w 10 -z $line > /dev/null 2>&1
  if [ $? -eq 0 ]
  then
    echo $line:ok
  else
    echo $line:fail
    echo "服务器 $line 端口不通,请尽快处理!" | mutt -s "【机房监控】服务器$line端口不通"  test@139.com
  fi
done
2、加入任务计划每2分钟执行一次
# crontab -e
*/2 * * * * /scripts/ncports.sh > /dev/null 2>&1
# service crond restart
linux 流量监控脚本
vim /root/network-check.sh
#!/bin/bash
# Date
# 2014.03.13
# Author      fengxxxx
# Function  实时检查系统的网络流量的大小

function networkdownup(){
        local nic=$1
        R1=`cat /sys/class/net/$nic/statistics/rx_bytes`
        T1=`cat /sys/class/net/$nic/statistics/tx_bytes`
        sleep 1
        R2=`cat /sys/class/net/$nic/statistics/rx_bytes`
        T2=`cat /sys/class/net/$nic/statistics/tx_bytes`
        TBPS=`expr $T2 - $T1`
        RBPS=`expr $R2 - $R1`
        TKBPS=`expr $TBPS / 1024`
        RKBPS=`expr $RBPS / 1024`
        echo "上传速率 $nic: $TKBPS kb/s 下载速率 $nic: $RKBPS kb/s at $(date +%Y%m%d%H:%M:%S)"
}


# run : 指定运行的检测次数,如果输入的次数为空,测默认检测10次
function run(){
        #num count default value  = 10
        num=${1:-10} ;
        local nic=$2 ;
        while [ $num -gt 0 ]
        do
                networkdownup $nic;
                num="$((num-1))"
        done

}

#检测一下字符是否是数学
# 如是是,就返回1 ;如是不是,就返回0
# use echo to pass retval
function checkInt(){
        local foo=$1
        if [[ $foo != *[!0-9]* ]]; then
                  # echo "'$foo' is strictly numeric"
                      echo 1
        else
                      #echo "'$foo' has a non-digit somewhere in it"
                      echo 0
        fi

}

### use return to pass retval
function checkInt2(){
        local foo=$1
        if [[ $foo != *[!0-9]* ]]; then
                  # echo "'$foo' is strictly numeric"
                      return 1
        else
                      #echo "'$foo' has a non-digit somewhere in it"
                      return 0
        fi
}

#######################       shell exec        #####################
# method 1
#retval=$(checkInt $1)

# method 2
time=${1:-10}
checkInt2 $time
retval=$?

if [ $retval -eq 0 ] ;then
                echo -e "检测的时间为数字(s),比如: sh network.sh [seconds] [nic] \ndefalut is sh network.sh 10 eth0 "
                exit 1
fi

nic=${2:-"eth0"}
falg_nic=0


### check the nic is exist ??
for var in `ls /sys/class/net/ -F | grep "@"`
    do
        [ "$nic"  == "${var%@}" ] && nic="${var%@}"  && falg_nic=1
    done


if [ $falg_nic -eq 1 ];then
        run $time $nic
    else
        echo "Sorry ,$nic don't exist ."
fi
#chmod +x /root/network-check.sh
#/root/network-check.sh 5 eth0
上传速率 eth0: 0 kb/s 下载速率 eth0: 0 kb/s at 2014052818:11:48
上传速率 eth0: 0 kb/s 下载速率 eth0: 0 kb/s at 2014052818:11:49
上传速率 eth0: 0 kb/s 下载速率 eth0: 0 kb/s at 2014052818:11:50
上传速率 eth0: 0 kb/s 下载速率 eth0: 0 kb/s at 2014052818:11:51
上传速率 eth0: 0 kb/s 下载速率 eth0: 0 kb/s at 2014052818:11:52
可以添加到计划任务中
crontab -e
*/30 * * * * /root/network-check.sh > /dev/null 2>&1
start crond start
系统初始化脚本
#!/bin/bash
# author: gm100861
# mail: gm100861@gmail.com
# blog: http://www.gm100861.com
# date: 2013-06-25
if [ $(id -u) != 0 ];then
echo "Must be root can do this."
exit 9
fi
# set privileges
chmod 600 /etc/passwd
chmod 600 /etc/shadow
chmod 600 /etc/group
chmod 600 /etc/gshadow
echo "Set important files privileges sucessfully"
# yum repo add
cat > /etc/yum.repos.d/thrid-repository.repo <<EOF
[epel]
name=Extra Packages for Enterprise Linux 6 - $basearch
baseurl=http://epel.mirror.ucloud.cn/epel/6/$basearch
failovermethod=priority
enabled=1
gpgcheck=1
gpgkey=file:///etc/pki/rpm-gpg/RPM-GPG-KEY-EPEL-6
[remi]
name=Les RPM de remi pour Enterprise Linux $releasever - $basearch
baseurl=http://remi.mirror.ucloud.cn
enabled=0
gpgcheck=0
gpgkey=file:///etc/pki/rpm-gpg/RPM-GPG-KEY-remi
[rpmforge]
name = RHEL - RPMforge.net - dag
baseurl = http://rpmforge.mirror.ucloud.cn/redhat/el6/en/$basearch/rpmforge
enabled = 1
protect = 0
gpgkey = file:///etc/pki/rpm-gpg/RPM-GPG-KEY-rpmforge-dag
gpgcheck = 0
[rpmforge-extras]
name = RHEL - RPMforge.net - extras
baseurl = http://rpmforge.mirror.ucloud.cn/redhat/el6/en/$basearch/extras
enabled = 1
protect = 0
gpgkey = file:///etc/pki/rpm-gpg/RPM-GPG-KEY-rpmforge-dag
gpgcheck = 0
EOF
yum clean all &>/dev/null
yum makecache &>/dev/null
echo "add thired repository sucessfully"
# Turn off unnecessary services
service=($(ls /etc/init.d/))
for i in ${service[@]}; do
case $i in
sshd|network|syslog|iptables|crond)
chkconfig $i on;;
*)
chkconfig $i off;;
esac
done
#set ulimit
cat >> /etc/security/limits.conf << EOF
* soft nofile 65535
* hard nofile 65535
EOF
# set sysctl
cat > /etc/sysctl.conf << EOF
net.ipv4.ip_forward = 0
net.ipv4.conf.default.rp_filter = 1
net.ipv4.conf.default.accept_source_route = 0
kernel.sysrq = 0
kernel.core_uses_pid = 1
kernel.msgmnb = 65536
kernel.msgmax = 65536
kernel.shmmax = 68719476736
kernel.shmall = 4294967296
net.ipv4.tcp_max_tw_buckets = 6000
net.ipv4.tcp_sack = 1
net.ipv4.tcp_window_scaling = 1
net.ipv4.tcp_rmem = 4096 87380 4194304
net.ipv4.tcp_wmem = 4096 16384 4194304
net.core.wmem_default = 8388608
net.core.rmem_default = 8388608
net.core.rmem_max = 16777216
net.core.wmem_max = 16777216
net.core.netdev_max_backlog = 262144
net.core.somaxconn = 262144
net.ipv4.tcp_max_orphans = 3276800
net.ipv4.tcp_syncookies = 1
net.ipv4.tcp_max_syn_backlog = 262144
net.ipv4.tcp_timestamps = 0
net.ipv4.tcp_synack_retries = 1
net.ipv4.tcp_syn_retries = 1
net.ipv4.tcp_tw_recycle = 1
net.ipv4.tcp_tw_reuse = 1
net.ipv4.tcp_mem = 94500000 915000000 927000000
net.ipv4.tcp_fin_timeout = 1
net.ipv4.tcp_keepalive_time = 1200
net.ipv4.ip_local_port_range = 1024 65535
vm.swappiness = 0
EOF
echo "0 0 * * * /usr/sbin/ntpdate cn.pool.ntp.org &>/dev/null" >>/var/spool/cron/root
# set iptables
iptables -F
iptables -X
iptables -Z
iptables -I INPUT -i lo -j ACCEPT
iptables -A INPUT -p tcp --dport 22 -j ACCEPT
iptables -A INPUT -p tcp --dport 80 -j ACCEPT
iptables -A INPUT -p tcp --dport 443 -j ACCEPT
iptables -A INPUT -p icmp --icmp-type 0 -m limit --limit 3/second --limit-burst 5 -j ACCEPT
iptables -A INPUT -p icmp --icmp-type 8 -m limit --limit 3/second --limit-burst 5 -j ACCEPT
iptables -A INPUT -p udp --sport 53 -j ACCEPT
iptables -A INPUT -p tcp --sport 53 -j ACCEPT
iptables -P INPUT DROP
#iptables -P FORWARD DROP
#iptables -P OUTPUT DROP
/etc/init.d/iptables save
echo "All things is init ok! "
一个防止暴力破解sshd的小脚本
#!/bin/bash
#denyhost ip

cat /var/log/secure|egrep -i -o "[0-9]{1,3}\.[0-9]{1,3}\.[0-9]{1,3}\.[0-9]{1,3}" | sort |uniq -c |sort -n  > /root/dropip
ORIGIN="150"

cat /root/dropip | while read LINE
do
        host=`echo $LINE|awk '{print $2}'`
        num=`echo $LINE |awk '{print $1}'`
        if [ $num -gt $ORIGIN ];then
                grep $host /etc/hosts.deny &> /dev/null
                if [ $? -gt 0 ];then
                        echo "ALL:$host" >> /etc/hosts.deny
                fi
        fi
done
linux系统服务rsync启动脚本
http://alanwake.blog.51cto.com/6881848/1421188
http://jishuweiwang.blog.51cto.com/6977090/1421184
关于Linux网卡***能调优之:RPS (Receive Packet Steering)
参考:http://navyaijm.blog.51cto.com/4647068/1334671
现如今服务器的CPU越来越强劲,RPS起初是谷歌为了发挥多CPU系统下网卡***能而给Linux打的补丁。RPS在系统层给网卡模块更多队列,更有效发挥网卡和CPU的协作能力。如今新版Kernel已默认采用了。
在定位LVS调度均衡***问题时,最终确定是 persistence_timeout 参数会使用IP哈希。目的是为了保证长连接,即一定时间内访问到的是同一台机器。但一般内部系统,由于出口IP相对单一,所以总会被哈希到相同的RealServer。
简单来讲,RPS就是让网卡使用多核CPU的。传统方法就是网卡多队列(RSS,需要硬件和驱动支持),RPS则是在系统层实现了分发和均衡。献上修改设置的脚本一例:
1、Broadcom的网卡建议关闭GRO功能
ethtool -K eth0 gro off
ethtool -K eth1 gro off
2、关闭irqbalance服务并手动分配网卡中断
service irqbalance stop
chkconfig irqbalance off
# 查看网卡中断号
grep ethx /proc/interrupts
$ grep em1 /proc/interrupts
  72:      62922          0          0          0  IR-PCI-MSI-edge      em1-0
  73:      12024          0          0          0  IR-PCI-MSI-edge      em1-1
  74:       2470          0          0          0  IR-PCI-MSI-edge      em1-2
  75:      99071          0          0          0  IR-PCI-MSI-edge      em1-3
  76:       1350          0          0          0  IR-PCI-MSI-edge      em1-4
$ grep em2 /proc/interrupts
  77:          8          0          0          0  IR-PCI-MSI-edge      em2-0
  78:      52607          0          0          0  IR-PCI-MSI-edge      em2-1
  79:       2471          0          0          0  IR-PCI-MSI-edge      em2-2
  80:        440          0          0          0  IR-PCI-MSI-edge      em2-3
  81:        670          0          0          0  IR-PCI-MSI-edge      em2-4
  # 分配到每颗颗CPU核上
  cat /proc/irq/{72,73,74,75,76,77,78,79,80,81}/smp_affinity
  PS:smp_affinity的值可以用下面脚本算
  #!/bin/bash
#
echo "统计cpu的16进制"
[ $# -ne 1 ] && echo ‘$1 is Cpu core number’ && exit 1
CCN=$1
echo “Print eth0 affinity”
for((i=0; i<${CCN}; i++))
do
echo ==============================
echo "Cpu Core $i is affinity"
((affinity=(1<<i)))
echo "obase=16;${affinity}" | bc
done
使用方法:sh 脚本名字 空格 cpu核数
###例如我的cpu是4核心的,统计出下面情况。
sh smp-affinity.sh 4
统计cpu的16进制
“Print eth0 affinity”
==============================
Cpu Core 0 is affinity
1
==============================
Cpu Core 1 is affinity
2
==============================
Cpu Core 2 is affinity
4
==============================
Cpu Core 3 is affinity
8

echo 1 > /proc/irq/72/smp_affinity
echo 2 > /proc/irq/73/smp_affinity
echo 4 > /proc/irq/74/smp_affinity
echo 8 > /proc/irq/75/smp_affinity
echo 10 > /proc/irq/76/smp_affinity
echo 20 > /proc/irq/77/smp_affinity
echo 40 > /proc/irq/78/smp_affinity
echo 80 > /proc/irq/79/smp_affinity
echo 100 > /proc/irq/80/smp_affinity
echo 200 > /proc/irq/81/smp_affinity
3、开启网卡的RPS功能 (Linux内核2.6.38或以上版本支持)
#!/bin/bash
# Enable RPS (Receive Packet Steering)
rfc=4096
cc=$(grep -c processor /proc/cpuinfo)
rsfe=$(echo $cc*$rfc | bc)
sysctl -w net.core.rps_sock_flow_entries=$rsfe
for fileRps in $(ls /sys/class/net/eth*/queues/rx-*/rps_cpus)
do
    echo fff > $fileRps
done
for fileRfc in $(ls /sys/class/net/eth*/queues/rx-*/rps_flow_cnt)
do
    echo $rfc > $fileRfc
done
tail /sys/class/net/eth*/queues/rx-*/{rps_cpus,rps_flow_cnt}
补充一些知识:
Linux运维常见系统服务介绍:http://www.tiejiang.org/996.html
irabalance服务主要是可以合理调配使用各个CPU核心,把压力分配到各个CPU核心上面,提升***能,降低能耗。它自动收集系统数据分析使用模式,将工作状态置于performance mode和power-save mode二种模式。
一般精简操作系统没有安装irabalance服务,
安装和开启irbalance
yum -y install irqbalance
service irqbalance start
chkconfig irqbalance on
mpstat -P ALL 1 10观察前后实际CPU使用运行情况
检查操作系统***诵懈鞲錾璞窱PO是不是启用了IRQBALANCE,通过下面命令可以看到
cat /proc/interrupts
           CPU0       CPU1       CPU2       CPU3
   0:        133          0          0          0  IR-IO-APIC-edge      timer
   3:          1          0          0          0  IR-IO-APIC-edge
   4:          1          0          0          0  IR-IO-APIC-edge
   8:          1          0          0          0  IR-IO-APIC-edge      rtc0
   9:          0          0          0          0  IR-IO-APIC-fasteoi   acpi
  10:        248          0          0          0  IR-IO-APIC-edge      ipmi_si
  22:       3574          0          0          0  IR-IO-APIC-fasteoi   ehci_hcd:usb2
  23:      66835          0          0          0  IR-IO-APIC-fasteoi   ehci_hcd:usb1
  56:          0          0          0          0  DMAR_MSI-edge      dmar0
  57:        496          0          0          0  IR-HPET_MSI-edge      hpet2
  58:          0          0          0          0  IR-HPET_MSI-edge      hpet3
  59:          0          0          0          0  IR-HPET_MSI-edge      hpet4
  60:          0          0          0          0  IR-HPET_MSI-edge      hpet5
  70:     126234          0          0          0  IR-PCI-MSI-edge      megasas
  71:    1043467          0          0          0  IR-PCI-MSI-edge      ahci
  72:      62249          0          0          0  IR-PCI-MSI-edge      em1-0
  73:      11391          0          0          0  IR-PCI-MSI-edge      em1-1
  74:       2443          0          0          0  IR-PCI-MSI-edge      em1-2
  75:      98906          0          0          0  IR-PCI-MSI-edge      em1-3
  76:       1323          0          0          0  IR-PCI-MSI-edge      em1-4
  77:          8          0          0          0  IR-PCI-MSI-edge      em2-0
  78:      51597          0          0          0  IR-PCI-MSI-edge      em2-1
  79:       2423          0          0          0  IR-PCI-MSI-edge      em2-2
  80:        430          0          0          0  IR-PCI-MSI-edge      em2-3
  81:        658          0          0          0  IR-PCI-MSI-edge      em2-4
从上面输出内容可以看出,网卡1(em0)和网卡2(em1)的IO并没有工作在负载均衡调度模式下面,所
有数据传输到cpu的第一个核里面去了,其它核处于空闲状态.
Linux下,普通用户如何临时获取root权限,来满足工作需要。
在实际工作中,公司不会将root用户直接给员工使用,而是通过员工自己的账号临时获得系统的root权限。
1.我现在测试的环境是:centos6.4-x64
2.创建两个普通用户,分别为kongzhong,xcg ;并设置密码
3.赋予root权限,有三种方式,如下:
在修改时,我们发现此文件只读,所以,我们需要在root用户下,将权限改成可修改的权限,修改完后,记得将权限改为原来的440
[root@rhel1 ~]# cd /etc/
[root@rhel1 etc]# ll sudoers
-r--r-----. 1 root root 4002 Mar  2  2012 sudoers
[root@rhel1 etc]# chmod 755 sudoers
[root@rhel1 etc]# ll sudoers
-rwxr-xr-x. 1 root root 4002 Mar  2  2012 sudoers
[root@rhel1 etc]# chmod 440 sudoers      # 此步,在修改好/etc/sudoers里面的内容后,将权限还原
(1).方法一:修改 /etc/sudoers 文件,找到下面一行,在root下面添加两行,如下所示:
[root@rhel1 ~]# vim /etc/sudoers
root    ALL=(ALL)       ALL
xcg     ALL=(ALL)       ALL                # 这个在切换时,是需要输入密码的,密码是当前普通用户的密码
kongzhong ALL=(ALL)     NOPASSWD:ALL       # 这个在切换时,不需要输入密码
修改完毕,用xcg,kongzhong帐号登录,
然后,执行sudo 命令,即可执行相应的命令;
或者 执行sudo su ,临时切换到root用户下,获取root权限。
(2).方法二:修改 /etc/sudoers 文件,去除下面这一行的注释,然后修改普通用户默认组为wheel
[root@rhel1 ~]# vim /etc/sudoers
%wheel    ALL=(ALL)    ALL
然后,修改普通用户,使其属于wheel 组,命令如下:
[root@rhel1 etc]# usermod -g wheel kongzhong1
修改完毕,用kongzhong1帐号登录;
然后,执行 sudo 命令,即可执行相应的命令;
或者 执行sudo su ,临时切换到root用户下,获取root权限
(3).方法三:修改 /etc/passwd 文件,找到如下行,把用户ID修改为 0 ,如下所示:
[root@rhel1 ~]# vim /etc/passwd
kongzhong2:x:504:504:kongzhong2:/home/kongzhong2:/bin/bash
修改后如下
kongzhong2:x:0:500:kongzhong2:/home/kongzhong2:/bin/bash
保存,用kongzhong2账户登录后,直接获取的就是root帐号的权限。
以上三种方法,建议使用 第一种,第三种强烈不建议使用,企业也不会去使用。
上一篇: 3proxy使用方法
下一篇: Apache MINA (3) NioS
- H3C基本命令大全
53073
- H3C IRF原理及 配置
39990
- Python exit()函数
34372
- python全系列官方中文文档
30123
- python 获取网卡实时流量
25018
- 1.常用turtle功能函数
24824
- python 获取Linux和Windows硬件信息
23200
- 天天基金网数据接口
16666
- Selenium使用代理IP&无头模式访问网站
14834
- Selenium&Pytesseract模拟登录+验证码识别
14332
- LangGraph Studio可视化
655°
- LangSmith开发-应用入门
616°
- LangGraph开发-多轮对话问答机器人
674°
- LangGraph开发-条件分支/循环图实战
692°
- LangGraph开发-生态介绍,入门demo实战
741°
- LangChain-接入12306-HTTP MCP智能体
868°
- LangChain接入自定义爬虫-MCP工具
834°
- LangChain接入Filesystem-MCP工具
854°
- LangChain搭建MCP服务端和客户端流程
952°
- LangGraph与MCP技术概述
875°
- 姓名:Run
- 职业:谜
- 邮箱:383697894@qq.com
- 定位:上海 · 松江
